


Critical Research Journal


 Beauty and the Beach… opened yesterday with a lovely soiree and will run until 24th August. Also on line at Landings 2918 http://www.landings.space for a year.
My 10 tips on mounting an exhibition ( which may be obvious to some but could also be helpful to others):
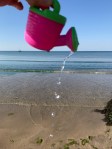
1. Think about potential audience(s). The context for mine is a three sided ‘booth’, one of several displaying the work of artists, in a working artist’s studio that also serves the community as a shop, post office and cafe. Based on the diversity of local and tourist custom in this area I included a range of images from seascapes to ‘abstracted beach debris’.
2. Consider how the images are displayed. I selected three groups to be placed on each of three walls: seascapes and finds that clearly identify what the subjects are, beach finds that start to intrigue through use of light, textures and tonal range and beach finds that have varying degrees of digital darkroom work and need closer viewing to understand what they are and how they were made (camera, scanner and cyanotype).
3. Decide what else to include. Products: I made products on varying surfaces to see how my images might look on glass, china, in acrylic, on hessian and towelling fabric. Incorporated into the exhibition of images as an ‘installation’ these have added interest and potentially value at several levels. In addition to encouraging a ‘double take’ and potentially enhanced impact between image on the wall and the product where the image has been presented in the two forms, they can strengthen the message you wish to convey, show a different perspective (e.g. ‘recycling’) and present items considered aesthetically pleasing and an object of discussion in their own right. Props: In addition to newly created products I included props to ‘set the scene’ reinforcing both raising awareness of beach debris and to show original items that featured in some of the images.
4. Prepare images and products well in advance in time for faults to be addressed, particularly if dependent on others (e.g. for printing and making products).
5. In the weeks leading up to the opening plan, discuss, shape and confirm arrangements for publicity, financial transactions, opening event and hospitality, and whether you need to be present during opening times or whether the event is ‘hosted’ by another on your behalf.
6. Develop a hanging plan according to the options available at the location and be prepared to adapt according to circumstances on the day.
7. Allow for doubling and even tripling your initial estimation of the time setting up will take.
8. Have an assistant for practical and moral support when setting up.
9. Expect the unexpected. Opinions, likes and dislike vary according to many factors, nature, nurture, life experiences and importantly neurological sensory and emotional sensitivity. As authors of ‘images’, having lived with and become very familiar with them over time, our attachments can be quite different to the response and relationship others form with an image.
10. Keep energy and wellbeing levels up during setting up and opening days and enjoy showing your work to others!


Week 7 was about making ‘dummy’books
Starting with Shelfies and Pilibraries we took images of our own shelves and piles. I have both. The shelves tend to be associated with my profession and piles with the growing pile of photography publications including mine made Ed Ruscha style. I also showed how a book can be a shelf as one acts like a docking station ’tilt’ for my laptop! I think about this book and its contents everyday, good news for my learning as it is authored by the course director!


Selecting images relating to our projects was the next more substantial challenge. Going back through mine since the start of the course I initially looked at those I had submitted for Work in Progress assignments. I then went back through to pick up all those not included in the assignments but for which I had a memory and this would be their opportunity to be ‘shown’ too. With nearly 200 I was starting to get lost in the forest!

Moving them around on screen and draft prints outs on cheap paper they began to work into themes over time then groups or collections that crossed the time boundaries. I started to see a progression in my development with diversifications into sub-projects along the way.
Working under a time pressure as this was a task for the week I moved on to the third stage of putting them into a sequence, explaining how they were to be displayed in a publication and presenting a mock up on film. This part of the task was as frustrating if not more so than the overview and selection of images. I wanted more time to be able to get hold of low environmental impact and recycled materials with which to make a physical copy to film. I have come across photorag paper made from cotton, seaweed paper, rice paper, plant based papers and even paper made from stone. I have also seen notebook covers made from recycled plastic bottles and tyres.

For the purposes of the task I filmed me turning A4 pages on which draft quality images were printed (to save ink). Uploading did not work so I resorted to still images with a flick over effect using Camtasia.
This felt like a very busy week and I was not satisfied with my outcome. However, the review of images was enlightening and my interest in materials to use in a publication has grown and also been inspired by the creative productions of others on the course. Suggestions received from my course varied from including the range of images since the project began to focussing on recent images which are abstractions of beach debris and one that suggested several books! In addition, webinar discussions led to the offer of editorship by my tutor as I was too close to the subject matter and images to see the ‘intrigue’ and ‘Beauty’ (as in the project title Beauty and the Beach…) others were seeing and feeling about them. A week later her editorship made me realise the value of such a task as it is not always possible to predict how viewers will see and respond to your own images. I will take this lesson and her suggestions forward into my thinking and planning for an actual publication.
Reference
Twentysix Gasoline Stations. 1963. Ed Ruscha. Available at: https://en.wikipedia.org/wiki/Twentysix_Gasoline_Stations. accessed [04-06-2018]
Surfaces and Strategies Week 4 Activity: Make 5 photographic images without using your camera and with relevance to your project
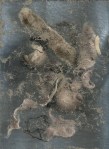
I took this literally given this weeks information was about alternative ways to create and present images. I sent away for a home cyanotype kit and also checked my printer and scanner were working with plenty of paper and ink. I have a DIY pinhole camera that uses film but it is still in kit form and at a late stage when about to construct it I realised that the film would not be processed in time for webinar discussions this week as I do not have the processing and fixing chemicals or a dark room and would have to use a local developer. I did try to create one using a margarine tub and some of the cyanotype paper but that was a misplaced idea as there was not enough light through the pinhole to get the chemical reaction started on the paper. In addition the day before the one specified for the activity I tried to make and image by placing shells on leaves which then turned brown except where the shells had been but I did not repeat this on the assigned day. So I am presenting the cyanotypes, scanned, copied and printed images I made.
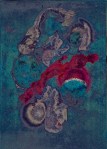
Cyanotypes
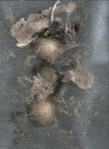
Using both natural and unnatural finds. Not being used to the kit paper and the sunlight strength I over exposed to start with. Images were washed and dried and scanned then emailed to my computer for processing and presentation.
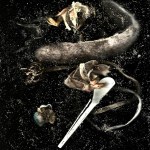
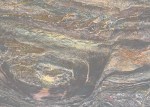
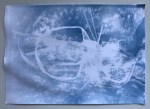
Scanned images
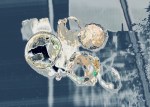
Using beach debris and white and black card to assist with the exposure as the scanner lid could not lie flat with the items I had placed on the glass. Images were uploaded and processed on my computer.
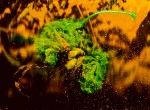
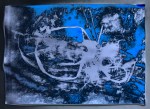
Photocopied images
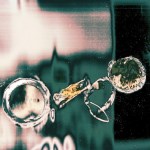
While scanning I inadvertently put pressure on the copy button and ended up with a copy as well as a scan of one or two images. I then used one of these to place as background for a fishing lure scan, attempting to make it look as though the lure was an alien organic creature swimming in the sea.
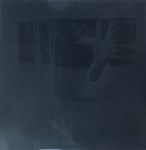
Processing
The images were uploaded to a Mac and I used the in house pictures programme to crop and adjust resolution and colour.
The experience has been fun but I have learned that more preparation would have been good, for example, in having the right equipment to process pinhole film. I also realised that using a scanner precludes large items as does making cyanotypes on small sheets of paper. Thus my larger items of beach debris could not be used. Perhaps I had better get on with making the pinhole camera and experimenting with the larger items and some seascapes!
No Camera Images Surfaces and Strategies Week 4 Activity
